Monday, February 21, 2011

Winter Reading

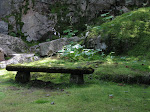
It is February and though a recent spring tease brought the crocus to life, the landscape is still drab, gray and barren.  During the "off-season," I tend to re-read books and magazines for inspiration and ideas for spring and summer projects. 

Most recently, I spent some time with Pamela Harper's Time-Tested Plants, a book my favorite plants professor swore was the best for learning how to craft a four-season garden. 

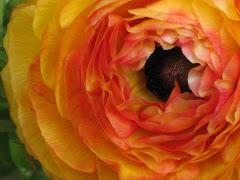
Her book is divided into seasons, and highlights key trees, shrubs and perennials, that when combined, can bring the landscape beauty at any time of the year.  Reading her section on autumn and winter reminded me of the plant I covet in February - Hamamelis x intermdiea, the witchhazel hybrids.  She eloquently describes the flowers of the cultivar 'Jelena', which blooms the longest of the hybrids:  "The blood-orange colors of its spidery apricot petals stretched out from crimson calyces bring a warm glow to the winter scene."  Planted with southern exposure to the sun gives a natural backlighting, offering a coppery glow to warm the day.

Michael Dirr, noted horticulturist and king of all things woody plants, questions "[w]hy these plants are not in greater use is beyond me."  Besides their contribution to bringing one out of the winter doldrums, they offer brilliant fall color and an interesting upright, spreading, loosely branched form. 

Thursday, January 20, 2011

The Girl Scout Cookie Dilemma

A few years ago, our family converted from "regular" food to "all natural" food, meaning we eliminated any and all artificial dyes, artificial preservatives and artificial flavorings.  It was as difficult a transition as we had anticipated and I like to believe that we are all now, and will be, healthier for the change.

Simple research into the production of artificially made ingredients will turn you off of them too (spoiler alert).  Vanillin, the artificial vanilla flavor, is made from paper mill waste.  That smell alone will have you looking again at the labels on your food packaging. 

FD&C food colors are petroleum by-products, often called tertiary products.  Rather than waste, the clever chemists at oil refineries figured it would be productive ($$$) to make other products after gasoline, rubber and plastics.  Of course, they just put the leftovers in our food.  Yum.

However, there are a few things that have been difficult to replace in our kitchen cupboard.  Marshmallows (yes, Kraft's Jet Puffed have blue dye to make them whiter).  M&Ms.  Girl Scout cookies.

Why Girl Scouts of America has not transitioned away from artificial ingredients, I'm not sure.  Even with a Girl Scout in the house, we skip ordering a year-long supply of Thin Mints, Do-si-dos and Samoas.  There are plenty of peanut butter cookie alternatives that are much better than Do-si-dos.  Whole Foods sells a brand of cookie called "Back to Nature" whose Fudge Mint cookies have the same crunch as Thin Mints.  But Samoas, there is nothing similar in any of the stores I now frequent.

After declining to order Samoas for my daughter today, I decided to hunt for a recipe to make them from scratch.  These - from the blog "Babble" - look like amazing treats.  I'm anticipating that they will likely taste much better than the original Samoas! 

Homemade Girl Scout Cookies: Samoas

2 sticks (1 cup) unsalted butter at room temperature
1 cup superfine sugar (or granulated)
1 large egg
1/2 teaspoon pure vanilla extract
1 teaspoon kosher salt
3 cups unbleached, all-purpose flour
Dipping Caramel (recipe follows)
1 cup unsweetened shredded coconut (available at health food stores)
12 ounces of chocolate chips

1. In the bowl of an electric mixer fitted with the paddle attachment, cream together butter and sugar. Beat until light and fluffy. Add in egg and beat until well incorporated, scraping down the bowl, if necessary. Add in vanilla. Beat until smooth. With mixer on low, add in salt and flour. Mix until completely incorporated and dough is uniform. Pull dough together and shape into a cylinder with a diameter of about 2 1/2 inches. Wrap in parchment paper and freeze for at least 25 minutes.

2. Preheat oven to 350 degrees. Slice dough into 1/8 inch disks and place on baking sheets, about an inch apart. Once you have made 30 cookies, wrap up the cookie dough, freeze, and save for another time. Use a tiny circle shaped cookie cutter or a large round cake decorating tip to cut a hole in the center of each disk. Refrigerate for an additional 10 minutes. Bake for 8 minutes, or until crisp. Let cool completely.

3. Add coconut into the caramel. Warm the caramel in the microwave for about 10 seconds if necessary. Take cooled cookies and gently dip them completely in the caramel. Place on a parchment paper lined baking sheet. Freeze until set, about 5 minutes.

4. Melt chocolate in a microwave safe bowl in 30 second intervals, stirring well after each interval, until fully melted. Place the caramel coated cookies in the chocolate. Use a fork to pull them out of the chocolate and place them on a parchment line cookie sheet. Use the chocolate still on the fork to drizzle stripes over the top of the cookies. Refrigerate until set.

Dipping Caramel
1 1/2 cups granulated sugar)
4 tablespoons corn syrup
6 tablespoons water
pinch of salt
6 tablespoons butter
6 tablespoons cream (DO NOT use plain whipping cream)
1 1/2 teaspoons pure vanilla extract

1. In a heavy bottomed saucepan with high sides, combine sugar, corn syrup, water, and salt. Whisk until combined, and set over medium-low heat. Swirl the pan every now and then to help distribute the heat. Use can use a pastry brush dipped in water to brush the sugar crystals down the sides of the saucepan. When the sugar dissolves completely, raise the heat to medium. When it comes to a boil, watch very carefully for the bubbles to become more viscous (this means that the water has evaporated and that it is ready to go through the candy stages). As it is bubbling away, you want it to turn a deep amber color. When it does, remove the heat and, working quickly, use the spoon to scoop up a small amount of the candy and drop it into the small glass of water. If the blob turns hard like lollipop, then it is ready. If the blob is still soft, put the pan back on the heat. Keep testing until the candy is hard. Remove from heat.

2. Whisk in butter, 6 tablespoons of cream, and vanilla (Careful here, as the mixture should bubble violently for about 10 seconds). If the caramel isn’t smooth right away, return the pan to low heat and whisk until smooth.

Monday, September 20, 2010

The Love/Hate Relationship Continues

Tomorrow is my garden club's "Harvest Fair."  I was supposed to grow vegetables from seed, nurture them all summer, and have beautiful specimen heirloom tomatoes or butternut squash to show off and win prizes.  I am not a good vegetable gardener.

Though mentally I am so "over" those hideous flowering quince, between work, vacations, school, kids and life, I still have not removed them from my garden.

In desperation, I went out this morning and harvested about 25 quince from the ugly shrubs. 

I washed them. 
I cut them up. 
I cooked them. 
I drained them. 
I cooked the juice with lots and lots of sugar. 
I made quince jelly. 


It's really quite tasty.  When it cools, I'm going to spread it on a cracker with some manchego cheese.

I'm still not keeping the shrubs, unless perhaps, I win a ribbon. 

Thursday, July 22, 2010

They Say That Breaking Up Is Hard To Do

Chaenomeles speciosa 'Texas Scarlet' in flower

I have had a long love/hate relationship with a hedge of Flowering Quince, Chaenomeles speciosa 'Texas Scarlet' shrubs. 

Nearly 15 years ago, our inherited foundation plantings of azaleas sited in full, southern sun had finally cut bait.  Eager, but not well-educated, I went fishing for new plants that could take the blazing sun, yet offer some color and interest.  The cultivar's name alone hooked me and I reeled in three tiny shrubs. 

I spaced them correctly, and followed all of the directions for proper planting and care.  Alas, no flowers the following spring.  Nor the next.  Not until their third year did they reveal any blossoms, but they were almost hidden in the foliage.  Truly, not the spectacular showing that I had envisioned.  I did some research and found that "renewal" pruning - like an almost break-up - would result in better flowering.  No such luck on my part as the hedging looked stubby, then resulted in no better flowering the following year.  Michael Dirr in his most eloquent way has said that while flowering quince "in full flower was beautiful, however, during the rest of the year (50 to 51 weeks) the planting was intolerable (emphasis added) . . . almost unlikeable."  I agreed completely.  But, with other areas upon which to focus my attention, I just left them alone for a number of years. 

Then, this spring, these plants brought forth a new hope, that they had changed and were worth keeping.  Flowers, they made flowers, lots of delicate rich red blossoms along interesting, sculpturally craggy stems.  Lovely, long cut branches were spectacular in a tall vase on the mantel.  Yes, they showed their worthiness of the space in my small garden.

That is, until now.  Obviously, my years of hatred and neglect and then sudden adoration has thus resulted in some sort of backlash.  The quince have produced, of all things, quince!  And not just one or two, but dozens upon dozens.  Quince are not desirable like sweet cherries or small plums or even a crabapple, but bitter and sour.  They are weighing down the branches and falling and rotting on the ground.  I'm not even considering making the effort of cooking and canning quince jam.


Chaenomeles speciosa 'Texas Scarlet' in fruit (foreground)

After all of the on-again, off-again feelings about these plants, I now realize that it's finally time to cut bait and put an end to this relationship and start anew. 

And really, it's me, not them.

Friday, July 16, 2010

Summer Blueberry Crisp

Our dear friends were visiting last weekend and we were hosting ten for dinner.  With rainstorms threatening all afternoon, the planned grilling and dinner outdoors was not a viable option.  Back to the drawing board, I crafted a summer country supper of homemade turkey meatloaf, creamy garlic mashed potatoes, roasted carrots with dill and fresh corn on the cob.  Very cold Budweiser and a light pinot gris were perfect accompaniements.  But this menu just beckoned a scrumptious blueberry crisp - and I dragged out my favorite Maine recipe.  The key is finding wild blueberries - they have less liquid and more flavor so the crisp is never runny and the berries never overpowered by the topping.  Just make sure you make enough for everyone to have second helpings!

Blueberry Crisp

4 cups wild blueberries
1/4 cup sugar
1/2 teaspoon grated lemon rind
1 cup butter
1 cup light brown sugar
2 teaspoons cinnamon
1 teaspoon nutmeg
1 cup flour
1 cup rolled oats

Combine the blueberries, sugar and lemon rind and place in an 8"x8"x2" baking dish.  Mix the flour, brown sugar, rolled oats, cinnamon and nutmeg.  Cut in the butter (like preparing a pie crust) until all ingredients are well blended (will be quite crumbly).  Spread over the blueberries; it does not have to completly cover the berries.

Bake at 325 degrees until the topping is golden and the filling bubbles in the center, approximately 45 minutes.  Serve warm with a scoop of vanilla ice cream.  Serves 8 people.

Wednesday, July 14, 2010

Worms in a Can

"It may be doubted whether there are many other animals which have played so important a part in the history of the world, as have these lowly organised creatures."  Charles Darwin, The Formation of Vegetable Mould, Through the Action of Worms, With Observations on Their Habits, 1881.

A proverbial can of worms was opened for me recently, and usually, such an occurence is not a welcome thing, especially when the worms have been tended and nicely packed away in their can for a couple of decades.  But it made me think a little further about how the idiom became commonly used.  The expression, a modern-day version of Pandora's box, is thought to have originiated in America around the 1950s, with fishermen who once opening their cans of worms had difficulty getting them back in the can.  Growing up, we often stopped on our way fishing to buy little styrofoam containers of worms - great for catching sun perch in our little lake in East Texas.  But we fished until all the worms were gone so I don't remember that it took much effort to put worms back into a container.

Worms are not just good for fishing, but amazing friends to have in the garden.  Author Amy Stewart wrote an lovely little book about the marvels of earthworms, The Earth Moved: On the Remarkable Achievements of Earthworms, and the important impact they have on the planet.   Gardeners know that if worms are found in the soil, it is often a good indication that the soil is fertile.  Worms convert organic matter into nutrients that plants can use.  They loosen the soil, making it easier for plant roots to grow and to absorb nutrients.  Worms also oxygenate the soil and increase the movement of water through the soil.  Too, they support additional wildlife in the garden as food for birds. 

Perhaps my worms can stay out of the can for a while . . .

Sunday, May 30, 2010

You Say "Ahndeeve" and I Say "Indive"

I've never been a fan of the pretentious endive, with its bitter taste and difficult pronunciation.  No matter how I try, I never seem to say the word correctly.  Picking it out of fancy salads, no way would I ever prepare endive and serve it to my friends.

Until last week.

With the tart endive, tangy cheese and sweet caramelized pears, this salad is scrumptious and gorgeous (but must be plated prior to serving). 

3 tablespoons butter
2 tablespoons sugar
2 pears, peeled and diced
2 cloves garlic, chopped
1 tablespoon red wine vinegar
1 teaspoon kosher salt
1 teaspoon freshly ground black pepper
1/4 cup extra virgin olive oil
1/2 cup Stilton cheese, crumbled (or any other blue cheese)
25 endive spears, rinsed and dried
1/2 cup pecan halves (or 25 pieces), toasted
watercress sprigs, for garnish
1 cup cream cheese, for presentation

In large saute pan over medium heat, add butter and sugar.  Add diced pears and cook until well caramelized, approximately 8 minutes.

In a small mixing bowl, whisk together garlic, red wine vinegar, salt, pepper and olive oil.  Add the mixture to the cheese.  Arrange the spears on a plate by first making a small mound of cream cheese in the center, then placing 3-4 endive spears on the cream cheese in a floral, three-dimensional pattern.  Top the center of the endive spears with the cheese, then sauteed pears, and topping them with a few toasted pecans.  Garnish with a sprig of watercress.